Frame, crop and filter your video
Use the Video tab to place your footage, crop it, give it a frame or a filter, and lay out two videos together.
Updated October 28, 2026
The Video tab decides how your footage sits in the frame: how big it is, which part of it shows, the frame drawn around it and the filter laid over it. With two videos, it also decides how they share the screen. None of this changes your files or when they play — it is how the picture looks in the video you export.
Everything you set here belongs to the cut on screen. Your vertical cut can be full screen in black and white while the horizontal one shows the whole picture in colour. See Cuts to learn more.
Before you start
- The tab appears only when your project has a video. A project made from audio alone has nothing to place, so it has no Video tab.
- Pick the cut you want to work on in the cut switcher in the bar at the top first.
Steps
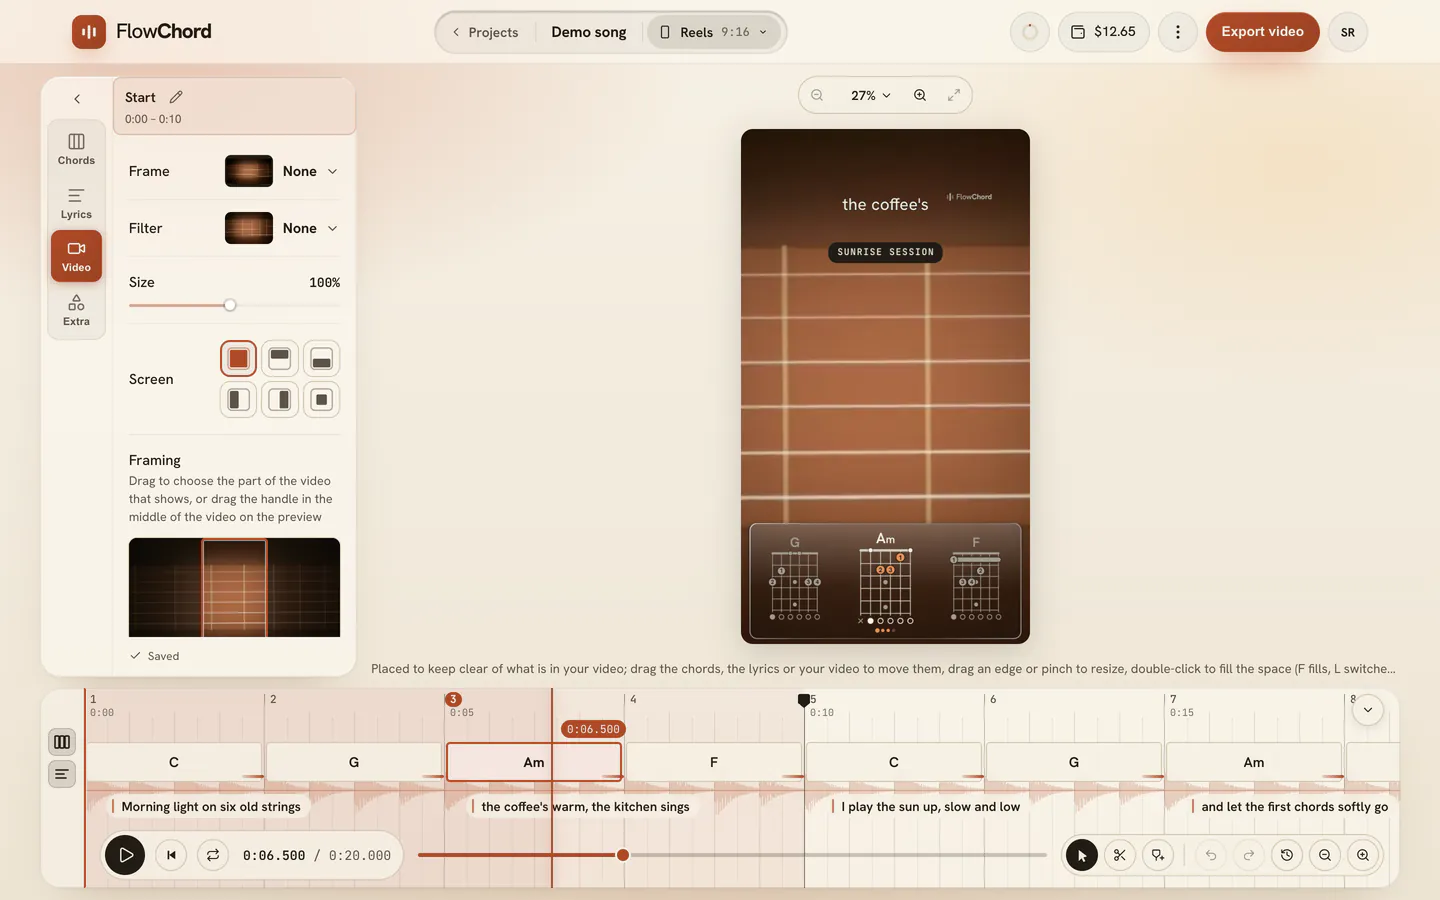
Size and place the video
- Open the Video tab in the settings card.
- Under Screen, choose how much of the frame the video takes up: Full screen, a half (Top half, Bottom half, Left half or Right half), or a Free window.
- With a Free window, choose its Shape: upright, wide or square.
- Drag the Size slider to zoom the picture in or out.
- If part of the picture is cut off, drag inside the Framing pad to choose the part that shows.
You can do the same right on the preview: drag the video to move it, drag its middle handle to reframe it, pinch, use + and −, or hold ⌥ (Alt on Windows) and turn the mouse wheel to zoom, drag a side to crop it, drag a corner to resize it, or double-click it to fill the frame. To start over, press Reset under the rows.
Add a frame
- Open the Frame row. Each tile shows your own footage in that frame.
- Pick a frame, such as Rounded, Polaroid, Film or Vintage TV.
- To take it off, pick None.
Add a filter
- Open the Filter row. Each tile shows your footage with that filter.
- Pick a filter. It goes on at full strength.
- Drag the Strength slider to make it subtler.
- To take it off, pick None.
Lay out two videos
When your project plays two videos at once, two more controls appear at the top of the tab.
- Under Layout, choose to split the frame (Stacked in a vertical cut, Side by side in a horizontal one) or Overlapping, with one video in a small window over the other.
- In the small map of the frame, click a video to pick it. The rows below it (frame, filter, size) then change that video.
- To share the frame differently, drag the line between the two videos.
- To trade places, press the swap button on the line (or on the small window).
Options
| Setting | What it does |
|---|---|
| Screen | How much of the frame the video fills: all of it, a half, or a window of its own |
| Size | Zooms the picture in its place |
| Framing | Picks the part of the picture that shows when not all of it fits |
| Frame | A frame drawn around the picture: rounded corners, a phone, a Polaroid, film, a vintage TV, neon and more |
| Filter | A look for the picture: Black & white, Noir, Silver, Film grain, Instant, Matte, Faded, Sepia, Duotone, Warm, Golden hour, Cool, Cinematic, Vivid, Lomo or Dreamy |
| Strength | How much of the filter is laid on |
| Layout | With two videos: split the frame, or one over the other |
Tips
- A filter changes only the picture. The chords, the lyrics and anything you put on the video stay as they are. With the blurred video as your background, the blur takes the filter’s colour too, so a black and white video gets no coloured glow.
- With two videos, the filter belongs to the video, so swapping their places takes the filter along. When one is laid over the other, the frame belongs to the place instead: the small window keeps its frame whichever video is in it.
- With the preview selected, the keyboard works too: arrows move the video, + and − resize it, F fills the frame, L switches between the video, the chords and the lyrics, and ⌥ / Alt with an arrow moves the picture inside its window.
- If your video fades in from black, the editor at rest on the start of the cut and the first frame of your exported file show the first picture with light in it instead of a black screen, so the thumbnail is never black. When it plays, the fade plays as recorded. A camera that is dark for just a moment at the start is covered by that first picture throughout.
- With markers in a cut, each stretch can have its own framing, frame and filter: the tab changes the stretch under the playhead.
- The background around the video (a blurred copy of it, a wallpaper or your own photo) is set in the Extra tab. See Song card, cover and background.
Common problems
I don’t see the Video tab. Your project has no video playing, for example a project made from an audio file. If you have several files, check that a video is turned on under Assets in the Extra tab. See Use several files in one project.
I changed the look and the other cut didn’t change. That’s on purpose: each cut has its own framing, frame and filter. Switch to the other cut and set it there.
There’s no Framing row. It shows only when part of the picture is hidden. If the whole picture fits, there is nothing to choose.
The video looks dark at the start of the preview but fine later. The preview at rest on the start shows the first lit picture; while playing, a fade from black plays as it was filmed. That’s what your viewers will see too.
Was this article helpful?
Still stuck?
Write to us and a person on the FlowChord team will answer by email.
Contact us