Put text, images and social cards on your video
Add your own text, a logo or an Instagram or YouTube card to your video, place and time it, and learn what the watermark can do.
Updated October 28, 2026
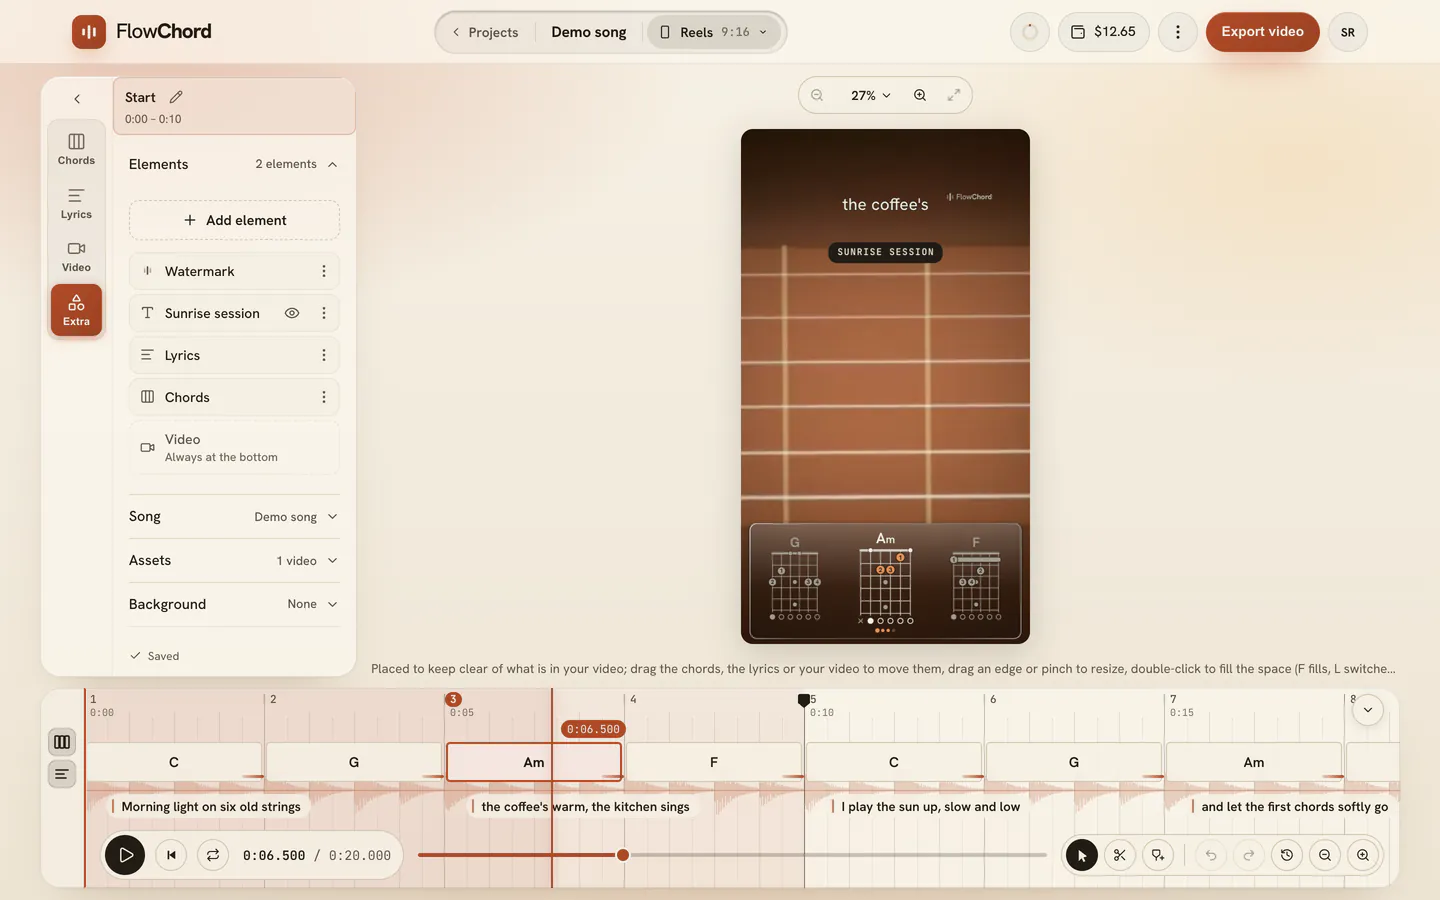
Elements are what you put on your video yourself: a line of text, a picture such as your logo, or a card for your Instagram profile or YouTube channel. You add them in the Extra tab, place them on the preview, choose when they show, and they appear in your export exactly as on screen.
Every new project also has one element of its own: the FlowChord watermark. More about it below.
Edits FlowChord planned for you on the Creator plan — notes, circles, checks, a closer camera — are elements like these, listed in their own Smart Edits section above the elements. See Smart Edits.
Before you start
- Open your project in the editor and pick the cut you want to add to in the cut switcher in the bar at the top. Each cut has its own elements.
- For an image, have a picture ready on your device. Images are kept with the project and count toward your storage.
Steps
Add a text
- Open the Extra tab and then Elements.
- Press Add element and choose Text.
- Under Choose a text style, pick a style, such as Headline, Tip or Handle.
- Type your words in the Text box.
- Drag the text on the preview to where you want it.
Add a mark
Marks point at something in the video: a circle round a mistake, an X over a note not to play, a check for the right way, an arrow to a string, a finger’s number.
- Pause the video on the moment you want to point at.
- Press Add element and choose Mark.
- Under Choose a mark, pick one. It is drawn in where the playhead is and stays a few seconds.
- Drag it on the preview over what it points at, and drag a corner to size it.
- In its settings, choose its Colour, its Lines (Neat or Hand-drawn) and its Thickness. A Finger or String mark also takes its number.
A mark comes in by being drawn (Draw) and leaves faded out, until you choose otherwise. On the timeline it is an element bar like any other: drag it, or drag its ends.
Add a sticker
Stickers are badges that say something at a glance: a calendar page with a day on it, Black Friday, a sale, a countdown, live, new, the link in your bio, save this video.
- Pause the video where it should show.
- Press Add element and choose Sticker.
- Under Choose a sticker, pick one. It pops in where the playhead is and stays a few seconds.
- In its settings, set its Day (the calendar), its Days to go (the countdown) or its Words (the others — leave them empty for its own), the Language of its words and its Colour.
A sticker’s own words are written in the language you choose for it, not the app’s: a video in Portuguese can say “Ao vivo” while you use FlowChord in English. A calendar page shows the day and the month, never the year.
Add an image
- Press Add element and choose Image.
- In Choose an image, press Upload an image, or pick an image you already added to this project.
- Drag the image on the preview to place it.
If you added a logo in Your brand, the menu also has My logo: it puts your logo on the video as a picture of this project. When Your brand later has a newer logo, the picture’s settings offer Use current logo; until you press it, the picture stays as it is.
Add an Instagram or YouTube card
- Press Add element and choose Instagram card or YouTube card.
- Paste the profile’s or channel’s link, or type its @handle. If you connected that channel in Your brand, the link starts with it.
- Press Add card.
The card comes in where the playhead is. It unfolds out of the platform’s icon, a fingertip taps the Follow or Subscribe button, and it folds away again. FlowChord fills in the name and picture when the platform shares them; otherwise you can add them in the card’s settings. The button’s words follow the language you pick under Button language.
In the card’s settings, Show followers (Instagram) or Show subscribers (YouTube) puts the count under the handle. It is off by default, and only a count the platform answered can be shown. When your channel in Your brand says something else than the card, Update from brand fills the card from it again; a later change to your brand never rewrites a card on its own.
Add from the preview
Right-click the preview where you want the element and choose what to add: the same kinds as Add element. FlowChord pauses the video, opens the Extra tab for the rest (a text’s style, an image, a card’s link) and puts the element with its middle where you clicked, kept inside the frame.
A text or an image added this way comes in where the playhead is and stays to the end of the video; added at the very start, it is there for the whole video. A card comes in where the playhead is, as above.
Place, size and turn it
- Click an element on the preview or in the list to select it. Its settings open in the card.
- Drag its body to move it. Guide lines appear when it lines up with the middle of the frame, the chords, the lyrics or another element.
- Drag a corner to resize it, or a side to change how wide a text runs.
- Drag the handle above it to turn it.
The Position, Size, Rotation and Opacity rows in its settings do the same from the card. A text or a card always stays whole inside the frame; an image can hang over its edges (see below).
Arrange the layers
The list under Elements is the video’s layers, the top one first: your elements, Chords and Lyrics in the order they are drawn, and Video at the bottom, under everything.
- Drag a row up or down to change what is drawn over what. An image dragged under Chords sits behind the chord diagrams, still over the video.
- Or open a row’s ⋮ menu and choose Bring to front, Bring forward, Send backward or Send to back. The same four are under Order in an image’s settings.
- Click a row to select it without moving it. An element hidden behind the chords can be selected here and then dragged on the preview.
- To protect an element, choose Lock in its menu, or turn on Lock in its settings. A locked element shows a padlock on its row; press it to unlock.
All the chord diagrams are one layer, whether one, two or three show. The title card goes with the lyrics.
Crop and round an image
- Select the image and press Crop image in its settings.
- Drag a side or a corner of the image on the preview to choose the part you keep. Any shape works: a square image can become a wide or a tall strip. Drag inside to slide the image under the crop.
- Press Done, or click away from the image. Press Reset crop to see the whole image again: nothing is lost.
- Drag the Corners slider to round the corners, from square to as round as the shape allows.
Resizing and cropping are separate: you can make the image bigger before or after cropping it. An image can be larger than the video and hang over its edges; only what is inside the frame is exported.
Put an image behind the chords
- Select the image and press Use behind chords under Chord background.
- Choose how it fills the chords’ background:
- Fit the style: the image takes the place of the style’s band, cropped to its shape without stretching. Set Zoom, Horizontal position and Vertical position to choose the part shown. Edge to edge in the Chords tab makes it a strip across the video, even for a style without a band.
- Keep original: the image keeps its own shape and transparency, for artwork you prepared yourself. Drag it on the preview and set its Size to place it against the chords.
- Move or resize the chords: the image follows them.
- To let it go, press Unlink. The image becomes an element of its own again, where it was. Hide it with its eye to see the style’s own background.
The Background row of the Chords tab shows the image behind the chords, lets you hide it or switch how it fills, and opens its settings.
Choose when it shows
- Under When, choose Whole video or Part of it.
- For Part of it, set From and To, or move the playhead and press Start here and End here.
- To have a Whole video element come in later and stay to the end, set Starts at.
- Pick how it arrives under Comes in and how it goes under Leaves, and drag the slider beside each to set how long it takes.
- Under Emphasis, choose what it does while it stays, such as Pulse or Shake, and how often: Twice, On the beat (with the song’s beats) or The whole time.
Elements with their own timing also get a bar on the timeline, in their own lane. Drag the bar to move it, or drag its ends to change when it starts and stops.
Options
| What | Choices |
|---|---|
| Text styles | Headline, Label, Highlight, Tip, Handle, Stamp, Paragraph, Announce, Watermark, Typed, Callout, Right, Wrong, Caution, Sticker |
| Text settings | Colour, Align, Capitals, Max lines |
| Ways in and out | Fade, Rise, Drop, Slide left, Slide right, Zoom, Pop, Light sweep, Unfold, Draw, Bounce, Wipe, Typewriter, Word by word, Letter by letter, Punch |
| Marks | Circle, Hand circle, X, Circle and X, Check, Circle and check, Arrow, Curved arrow, Underline, Strike out, Box, Brackets, Spotlight, Warning, Question |
| Music marks | Finger, String, Muted, Open string, Down stroke, Up stroke, Bend, Slide, Vibrato, Beat count |
| Progress marks | Progress bar, Countdown |
| Stickers | Calendar, Black Friday, Sale, Countdown, Live, New, Link in bio, Save this |
| Emphasis | Pulse, Heartbeat, Shake, Wiggle, Float, Blink; Once, Twice, 3 times, On the beat, The whole time |
| Element menu (⋮ on its row) | Rename, Duplicate, Bring to front, Bring forward, Send backward, Send to back, Lock, Delete |
The eye on an element’s row hides it from the preview and the export without deleting it. The list reads from the top: the element at the top of the list is drawn over the others.
The FlowChord watermark
Every new project gets a small FlowChord mark in the top right corner of the video. It says the video was made with FlowChord.
- You can move it, resize it, turn it and lock it, like any element, within a size range.
- It can’t be deleted, duplicated, faded or timed, and it always stays on top of the other elements.
- On the Creator plan, its row in the list has an eye, so you can hide it. Hiding is cut by cut: hide it in one cut and keep it in another. See Plans.
If you leave the Creator plan, the watermark shows again in every new export. Files you already exported stay as they were.
Your own logo can sign your videos too: Watermark on videos, in Your brand, puts it small and semi-transparent in the bottom-right corner of every export. It is not an element: it isn’t in this list and can’t be moved here, and the FlowChord watermark is drawn over it.
Tips
- With an element selected on the preview: arrows move it (hold Shift for bigger steps), + and − resize it, Delete removes it, ⌘ D / Ctrl D duplicates it, and Esc lets go.
- Changed your mind? While you’re working on elements, ⌘ Z / Ctrl Z undoes the last change.
- Lock an element you’ve placed so you don’t grab it by accident while dragging the chords or the video. It stays on the video, and you can still select it in the list.
- To make texts appear one after another and stay, give each Whole video with a later Starts at.
- When you add a new cut, you can start from a copy of another cut’s layout, elements included. With markers, each stretch of a cut has its own copy of the elements.
Common problems
I can’t find the watermark’s delete option. That’s expected: the watermark stays on every video. You can move it and make it smaller, and on the Creator plan you can hide it.
An Instagram card shows only the @handle. Instagram shares profiles with other apps only for business and creator accounts. Add the name under Name and a picture under Picture in the card’s settings.
The card says “That’s a link to a post”. Paste the link to the profile itself, not to a post or reel.
I can’t add more elements. The message This video has all the elements it can hold means the cut has reached its limit. Delete one you no longer use.
I can’t click an image behind the chords. The chords are over it, so a click there takes the chords. Click its row in the list, then drag it on the preview.
My element is in the list but not on the video. Check that its eye is on, and that the playhead is inside the time set under When.
I deleted an image from the project and some elements went with it. Removing an image from Choose an image removes it for good, along with the elements that showed it. The dialog says how many before you confirm.
Was this article helpful?
Still stuck?
Write to us and a person on the FlowChord team will answer by email.
Contact us