A tour of the editor
The stage, the settings card and its tabs, the timeline, cuts, undo and Export, and where to find each one on the screen.
Updated October 28, 2026
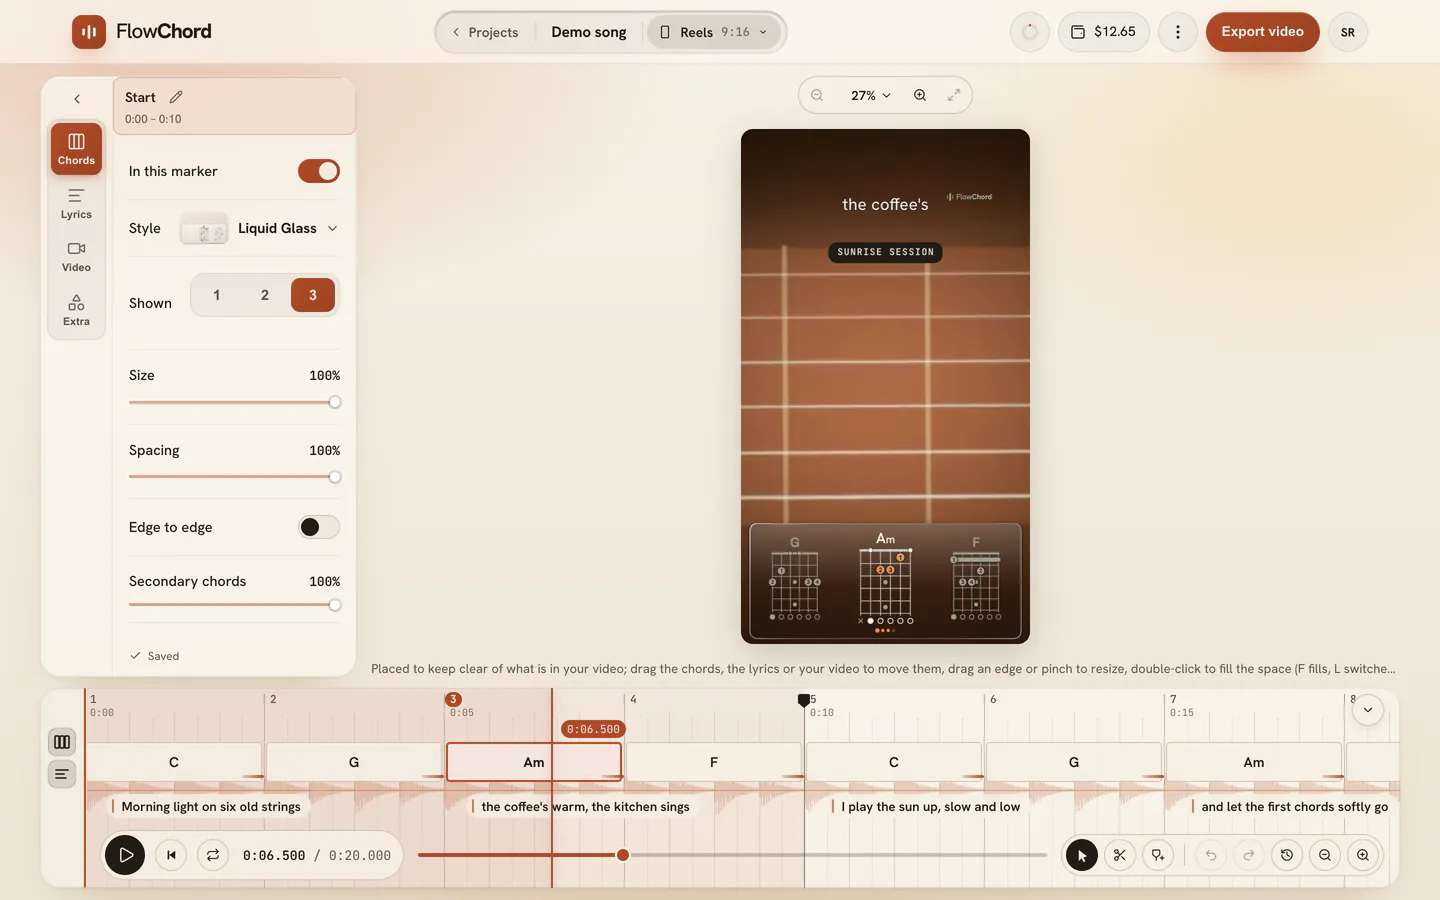
The editor is where a project becomes a video. It opens once FlowChord has found the chords, and it has four parts: the stage with the video as it will look, the settings card beside it, the timeline along the bottom and a bar across the top. Everything you change is saved as you go.
Before you start
- The project has finished processing. While FlowChord is still preparing files or detecting chords, the page shows its progress instead of the editor.
- You are on a computer with a wide enough browser window. On a phone or tablet, or in a narrow window, the editor is laid out in one column for touch: see FlowChord on your phone.
Steps
A typical session goes like this:
- Press Space to play the song and watch the stage.
- When a chord or a lyric line is wrong, click it on the timeline and fix it in the card that opens.
- Pick a tab on the settings card and choose how the chords, the lyrics and the video look.
- Drag the chords, the lyrics or your video on the stage to place them.
- Switch to another cut, if you have more than one, and check it too.
- Click Export video.
Options
The top bar
The bar at the top is the app’s, in its editor shape. In its centre sits a pill with three parts: Projects with an arrow, the way back to your projects; the project’s name — click it to rename the project; it reads Saving… for a moment while a change is being saved — and the cut switcher, with the cut’s name and shape. On the right are the project’s options menu (the three dots: Rename, Save as preset and Delete) and Export video, the one filled button. A free video also shows how to unlock the whole song here. On a narrow window the editor has a bar of its own instead, with the name over the cut: see FlowChord on your phone.

The stage
The stage plays the cut exactly as it will export: your video, the chord diagrams, the lyrics, the title card and anything you added on top. You can work on it directly:
- Drag the chords, the lyrics or your video to move them.
- Drag an edge to resize, or double-click to fill the space the layer is in.
- Click the chords, the lyrics, the title card or your video on the stage to open its tab on the settings card. To fix one chord or one line, pick it on the timeline.
To look closer at a small diagram, a finger number or a lyric, turn the mouse wheel over the stage, or scroll up and down with two fingers on a trackpad. The stage zooms in on the spot under the pointer, up to 400% of the video’s real size:
- While you are zoomed in, a small map of the whole video appears in the corner of the stage, with a frame around the part you are seeing. Drag the frame, or click anywhere on the map, to look at another part. The map plays along with the video.
- Dragging on the stage still moves the chords, the lyrics and your video, as before. Only the map moves your view, so you never move a chord by accident.
- The zoom buttons above the stage show how close you are. Click the percentage to pick Fit to screen or a size from 50% to 400%.
- Click Fit to screen (the arrows at the end), or click the stage and press ⇧ 1, to see the whole video again. The map goes away.
Zooming only changes your view in the editor. The exported video, its size and where everything sits in it stay exactly as they are.
The cut switcher in the bar at the top (under the project’s name on a narrow window) shows the cut you are looking at, with its name and shape. Click it to show another cut, to edit, duplicate or delete this one, or to add a cut (up to 6 per project). See Cuts.
The settings card
The card on the right holds every setting, in tabs that run down its left edge:
| Tab | What it holds |
|---|---|
| Chords | The chord style, how many chords are on screen at once, their size, diagrams, finger numbers, the notation, the tuning and capo, and the colour. |
| Lyrics | The lyric style, size, width, lines on screen, alignment, capitals, colour and opacity. Shown when the song has lyrics. |
| Video | Your video’s frame, its size and place, and filters. Shown when the project has a video. |
| Extra | Elements (text and images on the video, and the order of the video’s layers), Song (the title card), Assets (the project’s files and their sound) and Background. |
The look you set applies to the cut on the stage. The notation, the tuning and capo, the song’s details and the sound of the files are the project’s, the same in every cut. When a cut has markers, its look applies to the part of the cut under the playhead. See Markers.
To give the stage more room, click Collapse the panel at the top of the card. The card folds to its row of tabs. Click Expand the panel, or one of the tabs, to open it again. It only folds and opens when you ask.
The timeline

The timeline under the stage shows the song in time: the bar numbers along the top, the shape of the sound, the chords, the lyric lines, any elements and markers, and the playhead.
- Click anywhere on it to move the playhead there. Drag the bar numbers to scroll.
- Click a chord or a line to pick it. Its card opens beside the stage, where you can change it. Right-click it to see everything you can do to it, each with its key.
- Drag the edge between two chords to change when the chord changes.
Along the bottom of the timeline:
| Control | What it does |
|---|---|
| Play / Pause | Plays or pauses the song. Space does the same from anywhere on the page. L plays faster at each press and J backwards; the speed then shows beside the time, and K stops (see Keyboard shortcuts). |
| Back to the start | Takes the playhead to the start, with the time beside it. |
| Loop | Plays the video round and round: at its end it goes straight back to its start, so you can hear whether the last bar leads into the first, as a Reel does when it repeats. Press it again to stop. It only changes what you hear in the editor, never the exported video. R does the same. |
| The seek bar | Jumps anywhere in the song. |
| Select | The normal tool, to pick and drag chords and lines. |
| Cut | Cuts a part of the recording out of the video, such as a mistake. |
| Add marker | Splits the cut at the playhead so each part can have its own look. |
| Undo / Redo | Takes back your last change, or puts it back. |
| Change history | Lists your recent changes. Click one to go back to that moment. |
| Zoom out / Zoom in | Shows more or less of the song at once. |
To give the stage more height, click Collapse the timeline at the top of the timeline. Click Timeline to bring it back.
Down the left edge of the timeline, a column of buttons shows which lanes are on: Chords, Lyrics and Guitar tab. Point at one to see its name and its key. Click one to hide its lane, or to show it again: the lanes left move up into the space, and the guitar tab grows taller, its strings further apart and its numbers bigger. To work on one lane alone, hold ⌥ (Alt on Windows) and click it; the top of the timeline says which lane you are focused on. ⌥-click it again, click another lane, or click Show all to bring the others back. While a lane is hidden, Show all layers appears under the buttons.
The keyboard does the same from anywhere on the page: ⌥ 1, ⌥ 2 and ⌥ 4 show or hide the chords, the lyrics and the tab; ⇧ ⌥ and the same number shows that lane alone; ⌥ 0 shows them all. The sound always stays, so the timeline is never empty. It remembers what you hid on this browser, and hidden lanes are only hidden on the timeline: the video still shows them.
It works the other way too: when you turn In this cut off for the chords, the lyrics or the tab in the settings card, that lane leaves the timeline as well, since the video won’t show it. Click its button to bring the lane back while you work; it comes back by itself when you turn the switch on again. On a cut with markers, the lane stays as long as one part of the cut shows that layer.
Undo and history
Every change is a step you can undo with Undo or ⌘ Z (Ctrl Z on Windows), which takes back the change you made last. The chords, the lyrics, the cuts, the elements and the settings each keep their own history: Change history shows the one you worked in last, named beside the count, newest step first and the starting point at the bottom. In the chords’ history, Restore original puts the chords back to what FlowChord detected and clears that history, after asking you to confirm; in the lyrics’ history it does the same for the lyrics.
Export
Export video opens a dialog with every cut of the project. Tick the ones you want and start the export: each cut downloads as its own MP4. See Export your video.
Tips
- The keyboard makes fixing a song much faster: arrows walk from chord to chord, and letters change the chord picked. See Keyboard shortcuts.
- A click on the timeline while the song plays stops it on what you clicked, so you can fix it right away.
- The stage hint under the video reminds you how to move and resize what is on it.
Common problems
There is no timeline or settings card. Your browser window is too narrow, so the editor shows its one-column layout, with a timeline panel whose song runs down the screen, the video floating beside it, and the settings in sheets (how it works). Make the window wider, or maximise it: the editor changes as you resize, and nothing you were doing is lost.
The stage is blank but the sound plays. Your browser can’t show this video’s picture. Try an up-to-date browser on a computer. See Supported browsers.
The mouse wheel zooms the stage instead of my video’s picture. The wheel zooms your view. To zoom the picture inside your video’s frame, click your video, then hold ⌥ (Alt on Windows) and turn the wheel, pinch on a trackpad, or press + and −.
A setting changed in the wrong cut. The card works on the cut shown on the stage. Switch back to the other cut with the cut switcher and set it there.
A setting changed only part of the cut. The cut has markers, and the card works on the part under the playhead. See Markers.
Was this article helpful?
Still stuck?
Write to us and a person on the FlowChord team will answer by email.
Contact us